
This earl grey chiffon cake is hands down the best cake I have ever had. You won’t believe it’s gluten-free and dairy-free! So soft, moist, and spongy. Infused with earl grey tea, which gives it that extra bit of elegance.
Now I know it’s a bit of an eye roll when you hear a claim “it doesn’t even taste gluten free”, as someone who has had celiac since I was 5 I know majority of the time that is a lie. However, I can genuinely vouch that this does not taste gluten free at all. It’s light and airy, bounces back when you push it down, it’s not dry or crumbly. Even my partner said if I hadn’t told him, he would have had no idea!
I’m not a tea drinker myself, so I was apprehensive about trying to make an earl grey chiffon cake, but please do not let this put you off if you also aren’t a big fan of tea. It’s not overpowering, but makes the cake fragrant and gives it that extra pzazz that puts it at the top.
What is a chiffon cake?
Chiffon is a light and soft cake with a sponge texture. The cake is made by separating the eggs into yolks and whites. You whip the egg whites into an airy meringue, and use the yolks to make the base of the batter. By folding the meringue into the yolk mix, it allows the chiffon cake to rise and be its delicious fluffy texture.
Whilst the chiffon cake is described as spongy, but is not to be confused with sponge cake. Whilst both cakes use the method of whipping up the meringue and folding it into the yolk mixture, the key difference is that the chiffon cake has oil and sometimes baking powder. Chiffon cakes are spongy, but have a richer flavour and more moister texture than a sponge cake. Which is what makes it perfect for absorbing and accommodating the earl grey tea flavour.
Typically, chiffon cakes are supposed to be cooked in an angel food cake pan/tube, which does not have a non-stick coating. However, I do not have this specific cake tin and I found it turned out perfect with a regular circular cake pan. It is crucial that the cake tin/pan does not have a non-stick coating, as the chiffon cake batter needs to be able to stick to the sides in order to prevent deflation and falling. The chiffon cake also needs to be flipped upside down immediately after it is removed from the oven to cool and maintain its shape.
What to serve with chiffon cake?
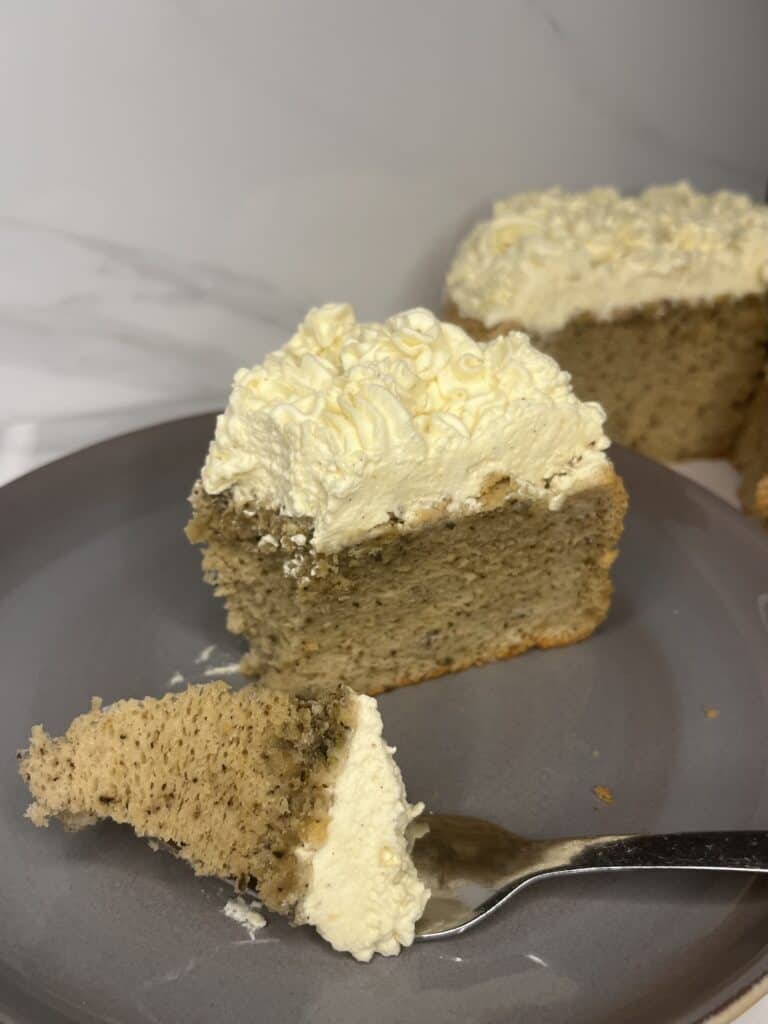
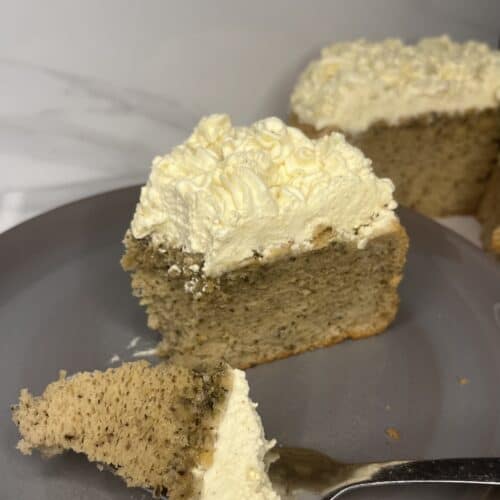
As you can see, I served this earl grey chiffon cake with whipped cream – which technically makes this cake non dairy free, the actual cake is dairy free however. I made a thick, sweet, vanilla whipped cream. Chiffon cake is typically paired with whipped cream as it compliments the cake due to it also being moist and airy. You could also serve them with fresh fruit.
To stick to being dairy free, you could use whipped coconut or cashew cream. The cake has coconut milk in it (that you can’t taste), it could compliment it well.
What makes this earl grey chiffon cake the best?
- Two flours. There are only two types of flours. After doing much research into gluten free baking, a common factor is the use of many different flours and starches. Which, in fairness, is needed for some recipes. However, this gorgeous cake only requires rice flour and cornflour.
- It’s simple. Beat the egg whites with sugar and cream of tartar to make the meringue, mix the yolk with the wet ingredients and flour, then fold them together. It may be slightly time consuming, as most baking is, but making this chiffon cake is easy – and the reward vs the time taken is so worth it!
- The texture. Despite being gluten and dairy free this recipe makes sure you get the perfect chiffon cake experience. Forget stodgy and dry allergen friendly cakes!
Key ingredients:
- Earl grey tea bags – you can use any brand you prefer for the earl grey tea. As this chiffon cake recipe has actual tea leaves in the batter, I would recommend you make sure they are finely ground. Most tea bags will have fine leaves anyway, but if you do find they seem a bit large, just grind them down slightly.
- Coconut milk – using this in the chiffon cake enhances the moisture and tenderness. Due to it being rich in natural fats and oils, it can help prevent the cake becoming dry. You could alternate this with regular milk if you would prefer, but I highly recommend using coconut milk. You cannot taste the coconut milk in the final result after the cake has been baked.
- Eggs – your eggs will need to be room temperature, the meringue will not be the best if you use cold eggs. If you store your eggs in the fridge, you will need to take them out at least 20 minutes before you begin. In this recipe you will need 6 large eggs, if you cannot get large then use 7/8 smaller ones. With any chiffon cake recipe it is important to split the eggs into yolks and whites for the meringue and wet mix.
- Cream of tartar – this is mixed in with the sugar that is added to the meringue. It is an acidic powder that stabilises the egg whites to ensure a meringue with good structure.
- Oil – by adding oil to the cake it ensures a moist texture that remains soft, instead of butter that can harden when cooled. It is important to use a light tasting oil as to not interfere with the flavour. Olive oil has a strong flavour, so it is better to use something like cooking oil, canola oil, avocado oil, etc.
- Vanilla extract – using vanilla extract adds a nice balance to the earl grey tea flavour in the cake.
- Rice flour – by using rice flour in this chiffon cake it not only makes a great gluten free option, it has a finer and smoother texture compared to an all purpose flour. By having this texture it helps create a moist, softer cake. It also prevents the chiffon cake from becoming too dense.
- Cornflour – helps create a balanced starch blend which aids the rice flour in its structure, moisture retention, and texture.
- Baking powder – whilst chiffon cakes main contributor to its airy texture is the meringue, adding baking powder is a back up in case the meringue needs some more support.
- Sugar – use a fine white sugar, I have used castor sugar to ensure it blends nicely into the batter.
How to make this earl grey chiffon cake?
Make the earl grey infused coconut milk.
In a small pot, bring the coconut milk to a boil. Once it starts bubbling add three earl grey tea bags, then remove from the heat and leave to steep. Let this steep for at least 10 minutes. Before removing the tea bags, squeeze them into the coconut milk to ensure you have all the tea flavour.
Preparation of the earl grey chiffon cake.
Before starting the batter, preheat the oven to 160℃. In two large bowls, separate the eggs into whites and yolks. Set the yolks aside.
Make the meringue.
Beat the egg whites until they become frothy and start turning opaque. Then add ½ teaspoon cream of tartar and beat again until it turns into a foam consistency. Now start to add in the 150 grams of sugar. Add it slowly by doing about 1 tablespoon at a time, beating the meringue mix well between each tablespoon of sugar. After all the sugar has been mixed, continue whipping the meringue until it forms stiff peaks. Then set the meringue aside.
Create the cakes wet mix.
To the bowl of egg yolks add the oil, 50 grams of sugar, coconut early grey tea milk, and vanilla extract. Whisk until combined.
Add the flour mix.
Use a mesh sieve, finely sift in the rice flour, cornflour, salt, and baking powder. Then pour in the earl grey tea leaves. Mix the batter until smooth.
Combine the meringue with the yolk mixture.
Start by adding ⅓ of the meringue into the yolk mix. Instead of mixing them together, you need to fold with a spatula to combine. If you mix then the meringue will deflate and the chiffon cake will lose its airy texture. Continue folding in the remaining ⅔ until fully combined.
Pour into the pan.
To your non-greased cake tin, slowly pour the cake batter. Only pour from one spot, and allow the batter to spread and flow by itself. Doing this avoids creating air pockets. Once the pan is full, gently lift and drop the tin on the bench a few times to release any potential air bubbles.
Bake the earl grey chiffon cake.
Carefully place the cake in the oven, put in on the lower rack. Bake for 50 minutes until the top is golden brown. You can quickly check the cake it cooked by placing a toothpick in it, if it comes out with some batter then place the cake back in the oven for another 5 minutes. Do not open the oven to check on the cake for at least 45 minutes.
Cool the cake.
Once you have checked the cake is cooked, immediately place it upside in the tin on a wire rack. You want to ensure it is on a wire rack so that the cake has airflow. Leave the cake to sit for a minimum of 2 hours to prevent the cake from deflating.
Serve the cake.
To release the cake from the tin, run a spatula or knife around the edges and gently lift. The cake is served upside down. Using a piping bag, add dollops of sweet vanilla whipped cream – or decorate with your choice of topping.
How to store this earl grey chiffon cake?
If the chiffon cake has whipped cream or any topping, it can last up to 5 days in the fridge if stored in an airtight container. If it does not have the whipped cream or topping, it can last 2-3 days in an airtight container outside of the fridge. Keep in mind if you are getting close to 5 days in the fridge, expect it to be dryer than when you put it in. You can also freeze the cake for a few weeks, remove and thaw overnight in the fridge before eating.
More for your sweet tooth:
- Apple and Peach Crumble
- Lemon Lime Cheesecake
- Cinnamon Chocolate Chip Cookies
- Mango Sago
- Apple Walnut Scones
- White Chocolate Pistachio Cookies
- Apple Pie
- Pumpkin Coffee Cake
Alrighty, I think it’s time to get baking! Let me know below if you loved this cake as much as I do.
Earl Grey Chiffon Cake (GF)
Ingredients
Cake Ingredients
- 6 large eggs room temp, split into whites and yolks
- 70 grams light oil
- 220 grams sugar split into 150 + 70
- 1 tbsp vanilla essence
- 120 grams rice flour
- 60 grams cornstarch
- ½ tsp salt
- 1 tsp baking powder
- 2 earl grey teabags
- ½ tsp cream of tartar
Earl Grey Milk
- 200 ml coconut milk
- 3 earl grey tea bags
Whipped Cream
- 300 ml cream
- 30 grams icing sugar
- 1 tsp vanilla essence
Instructions
- In a small pot heat the coconut milk and 3 of the earl grey tea bags. Once boiling, remove from heat and leave to steep for at least 10 minutes..
- Preheat the oven to 160℃.
- Separate the eggs into yolks and whites, place both in large mixing bowls.
- Beat the egg whites on medium speed until frothy. Then add the cream of tartar, whip until it begins to turn opaque.
- Increase beater to a medium-high speed. Start to slowly add the sugar (150 grams) by the tablespoon in intervals of about 1 minute.
- Continue to beat the egg white meringue mixture until it forms stiff peaks, it should hold its shape well when the whisk is lifted.
- In the bowl with the egg yolks add the oil, sugar (50g), coconut tea milk, and vanilla essence. Whisk until combined.
- Finely sift the flour mixture (rice flour, cornflour, baking powder, and salt) into the batter. Combine until smooth, be careful not to overmix.
- Now start to gently fold in a ⅓ of the meringue mix into the batter. You will need to be gentle whilst combining so as to not over mix.
- Repeat twice with the remaining ⅔ of the meringue mix, until the batter is combined and still airy.
- Pour the batter into your baking tin. Pour from one spot and let the batter spread itself out. Use a toothpick to pop any air bubbles you may see.
- Bake at 160℃ for 50 minutes, do not open the oven door to check on the cake until at least 45 minutes.
- Once finished baking, remove from the oven and invert the pan upside down immediately.
- Leave to cool for at least 2 hours, there should be airflow access from either the legs of the pan or a wire rack underneath.
- Top with sweet whipped cream.
